[NX501A] Instruction for software update
1.Preparation
1-1. You will need a blank MicroSD Card that has a capacity of more than 128MB.
(You cannot use the 4G Micro SD card that came with the NX501A. If you do, it will void your warranty and you will need to purchase a replacement card.)
1-2. Please download the "20110610_NX501A.zip" file from download page and save to your computer.
Download "20110610_NX501A.zip" file (About 33.1MB)
1-3. After the download is complete you will need to unzip the "20110610_NX501A.zip" file using WinZip (http://www.winzip.com/downwz.htm ).
A folder named "SW_Update" will be created. Then copy the "SW_Update" File to the blank MicroSD Card.
2.Update
2-1. Please turn the NX501A off by pressing in on the Volume Knob until NX501A shuts off.
2-2. With the NX501A powered off, please remove the MicroSD Card that is currently in the MicroSD Card Slot.
Then insert the MicroSD Card that has the "SW_Update" into the MicroSD Card Slot.
2-3. With the MicroSD Card that contains the "SW_Update" file inserted into the NX501A, please press in on the Volume Knob until the NX501A turn on.
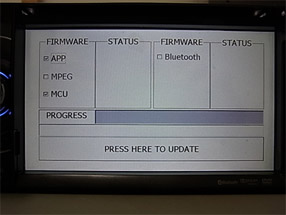
2-4. The NX501A will now walk you through the update process. Please touch the "PRESS HERE TO UPDATE" option.
|
|
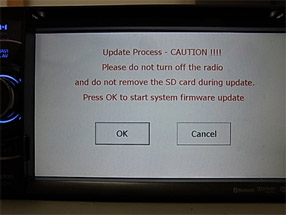
2-5. Please touch the "OK" option.
|
|
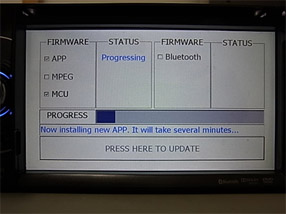
2-6. When you see the update status bar showing the "APP" update progress, please do not unplug, disconnect or power off the NX501A until the update has been completed.
This portion of the update will take about two minutes to complete.
|
|
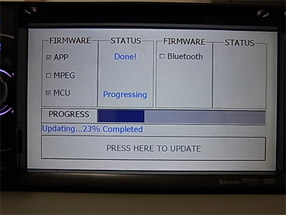
2-7. When you see the update status bar showing the update progress of the MCU, please do not unplug, disconnect or power off the NX501A until the update has been completed.
This portion of the update will take about one minute to complete.
|
|
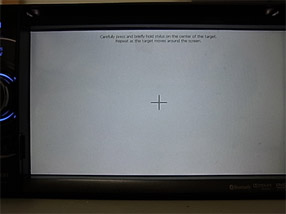
2-8. When the "APP" and "MCU" has finished its update, the screen will ask you to adjust the Touch Screen Calibration.
Please follow the instructions on the screen to properly calibrate the touch screen by touching the crosshairs (+) with your finger tip or by using a touch screen stylus pen.
|
|
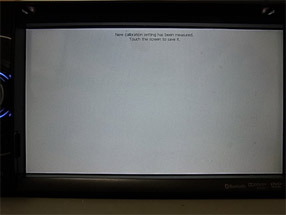
2-9. After you have completed the touch screen calibration steps, touch the screen in any location to exit the touch screen calibration.
|
|
2-10. Please power off the NX501A by pressing in on the volume knob until the NX501A shuts down.
2-11. With the NX501A powered off, please remove the MicroSD Card that contains the "SW_Update" file.
2-12. Please power the NX501A on by pressing in on the volume knob until the NX501A turns on.
3.Confirm result
3-1. With the NX501A powered on, please press the MENU Button that is located at the top left corner of the NX501A.
3-2. Please press Setting button (Touch panel button at the bottom of the right side of the screen)
3-3. Please scroll to the end of General item.
3-4. Please press Version button (Touch panel button)
3-5. Please confirm the following version.
APP_V:3.9.15_01N3_110610
MCU_V:0.1.12_01N3_110607
Return to the top of the page